0
Understanding The Alloys Of Aluminum
With the growth of aluminum within the welding fabrication industry, and its acceptance as an excellent alternative to steel for many applications, there are increasing requirements for those involved with developing aluminum projects to become more familiar with this group of materials. To fully understand aluminum,it is advisable to start by becoming acquainted with the aluminum identification / designation system, the many aluminum alloys available and their characteristics.
Aluminum alloys can be categorized into a number of groups based on the particular material’s characteristics such as its ability to respond to thermal and mechanical treatment and the primary alloying element added to the aluminum alloy. When we consider the numbering / identification system used for aluminum alloys, the above characteristics are identified. The wrought and cast aluminums have different systems of identification. The wrought system is a 4-digit system and the castings having a 3-digit and 1-decimal place system.
Wrought Alloy Designation System - We shall first consider the 4-digit wrought aluminum alloy identification system. The first digit (Xxxx) indicates the principal alloying element, which has been added to the aluminum alloy and is often used to describe the aluminum alloy series, i.e., 1000 series, 2000 series, 3000 series, up to 8000 series (see table 1).
The second single digit (xXxx), if different from 0, indicates a modification of the specific alloy, and the third and fourth digits (xxXX) are arbitrary numbers given to identify a specific alloy in the series. Example: In alloy 5183, the number 5 indicates that it is of the magnesium alloy series, the 1 indicates that it is the 1stmodification to the original alloy 5083, and the 83 identifies it in the 5xxx series.
The only exception to this alloy numbering system is with the 1xxx series aluminum alloys (pure aluminums) in which case, the last 2 digits provide the minimum aluminum percentage above 99%, i.e., Alloy 13(50) (99.50% minimum aluminum).
WROUGHT ALUMINUM ALLOY DESIGNATION SYSTEM
| Alloy Series | Principal Alloying Element |
1xxx
|
99.000% Minimum Aluminum
|
2xxx
|
Copper
|
3xxx
|
Manganese
|
4xxx
|
Silicon
|
5xxx
|
Magnesium
|
6xxx
|
Magnesium and Silicon
|
7xxx
|
Zinc
|
8xxx
|
Other Elements
|
Table 1
Cast Alloy Designation - The cast alloy designation system is based on a 3 digit-plus decimal designation xxx.x (i.e. 356.0). The first digit (Xxx.x) indicates the principal alloying element, which has been added to the aluminum alloy (see table 2).
CAST ALUMINUM ALLOY DESIGNATION SYSTEM
Alloy Series
| Principal Alloying Element |
1xx.x
|
99.000% minimum Aluminum
|
2xx.x
|
Copper
|
3xx.x
|
Silicon Plus Copper and/or Magnesium
|
4xx.x
|
Silicon
|
5xx.x
|
Magnesium
|
6xx.x
|
Unused Series
|
7xx.x
|
Zinc
|
8xx.x
|
Tin
|
9xx.x
|
Other Elements
|
Table 2
The second and third digits (xXX.x) are arbitrary numbers given to identify a specific alloy in the series. The number following the decimal point indicates whether the alloy is a casting (.0) or an ingot (.1 or .2). A capital letter prefix indicates a modification to a specific alloy.
Example: Alloy - A356.0 the capital A (Axxx.x) indicates a modification of alloy 356.0. The number 3 (A3xx.x) indicates that it is of the silicon plus copper and/or magnesium series. The 56 in (Ax56.0) identifies the alloy within the 3xx.x series, and the .0 (Axxx.0) indicates that it is a final shape casting and not an ingot.
Example: Alloy - A356.0 the capital A (Axxx.x) indicates a modification of alloy 356.0. The number 3 (A3xx.x) indicates that it is of the silicon plus copper and/or magnesium series. The 56 in (Ax56.0) identifies the alloy within the 3xx.x series, and the .0 (Axxx.0) indicates that it is a final shape casting and not an ingot.
The Aluminum Temper Designation System - If we consider the different series of aluminum alloys, we will see that there are considerable differences in their characteristics and consequent application. The first point to recognize, after understanding the identification system, is that there are two distinctly different types of aluminum within the series mentioned above. These are the Heat Treatable Aluminum alloys (those which can gain strength through the addition of heat) and the Non-Heat Treatable Aluminum alloys. This distinction is particularly important when considering the affects of arc welding on these two types of materials.
The 1xxx, 3xxx, and 5xxx series wrought aluminum alloys are non-heat treatable and are strain hardenable only. The 2xxx, 6xxx, and 7xxx series wrought aluminum alloys are heat treatable and the 4xxx series consist of both heat treatable and non-heat treatable alloys. The 2xx.x, 3xx.x, 4xx.x and 7xx.x series cast alloys are heat treatable. Strain hardening is not generally applied to castings.
The heat treatable alloys acquire their optimum mechanical properties through a process of thermal treatment, the most common thermal treatments being Solution Heat Treatment and Artificial Aging. Solution Heat Treatment is the process of heating the alloy to an elevated temperature (around 990 Deg. F) in order to put the alloying elements or compounds into solution. This is followed by quenching, usually in water, to produce a supersaturated solution at room temperature. Solution heat treatment is usually followed by aging. Aging is the precipitation of a portion of the elements or compounds from a supersaturated solution in order to yield desirable properties.
The non-heat treatable alloys acquire their optimum mechanical properties through Strain Hardening. Strain hardening is the method of increasing strength through the application of cold working.T6, 6063-T4, 5052-H32, 5083-H112.
THE BASIC TEMPER DESIGNATIONS
Letter
|
Meaning
|
F
|
As fabricated – Applies to products of a forming process in which no special control over thermal or strain hardening conditions is employed
|
O
|
Annealed – Applies to product which has been heated to produce the lowest strength condition to improve ductility and dimensional stability
|
H
|
Strain Hardened – Applies to products that are strengthened through cold-working. The strain hardening may be followed by supplementary thermal treatment, which produces some reduction in strength. The “H” is always followed by two or more digits (see subdivisions of H temper below)
|
W
|
Solution Heat-Treated – An unstable temper applicable only to alloys which age spontaneously at room temperature after solution heat-treatment
|
T
|
Thermally Treated - To produce stable tempers other than F, O, or H. Applies to product that has been heat-treated, sometimes with supplementary strain-hardening, to produce a stable temper. The “T” is always followed by one or more digits (see subdivisions of T temper below)
|
Table 3
Further to the basic temper designation, there are two subdivision categories, one addressing the “H” Temper – Strain Hardening, and the other addressing the “T” Temper – Thermally Treated designation.
Subdivisions of H Temper – Strain Hardened
The first digit after the H indicates a basic operation:
H1 – Strain Hardened Only.
H2 – Strain Hardened and Partially Annealed.
H3 – Strain Hardened and Stabilized.
H4 – Strain Hardened and Lacquered or Painted.
H1 – Strain Hardened Only.
H2 – Strain Hardened and Partially Annealed.
H3 – Strain Hardened and Stabilized.
H4 – Strain Hardened and Lacquered or Painted.
The second digit after the H indicates the degree of strain hardening:
HX2 – Quarter Hard HX4 – Half Hard HX6 – Three-Quarters Hard
HX8 – Full Hard HX9 – Extra Hard
HX2 – Quarter Hard HX4 – Half Hard HX6 – Three-Quarters Hard
HX8 – Full Hard HX9 – Extra Hard
Subdivisions of T Temper – Thermally Treated
T1 - Naturally aged after cooling from an elevated temperature shaping process, such as extruding.
T2 - Cold worked after cooling from an elevated temperature shaping process and then naturally aged.
T3 - Solution heat-treated, cold worked and naturally aged.
T4 - Solution heat-treated and naturally aged.
T5 - Artificially aged after cooling from an elevated temperature shaping process.
T6 - Solution heat-treated and artificially aged.
T7 - Solution heat-treated and stabilized (overaged).
T8 - Solution heat-treated, cold worked and artificially aged.
T9 - Solution heat treated, artificially aged and cold worked.
T10 - Cold worked after cooling from an elevated temperature shaping process and then artificially aged.
Additional digits indicate stress relief.
Examples:
TX51 or TXX51 – Stress relieved by stretching.
TX52 or TXX52 – Stress relieved by compressing.
Examples:
TX51 or TXX51 – Stress relieved by stretching.
TX52 or TXX52 – Stress relieved by compressing.
Aluminum Alloys And Their Characteristics - If we consider the seven series of wrought aluminum alloys, we will appreciate their differences and understand their applications and characteristics.
1xxx Series Alloys – (non-heat treatable – with ultimate tensile strength of 10 to 27 ksi) this series is often referred to as the pure aluminum series because it is required to have 99.0% minimum aluminum. They are weldable. However, because of their narrow melting range, they require certain considerations in order to produce acceptable welding procedures. When considered for fabrication, these alloys are selected primarily for their superior corrosion resistance such as in specialized chemical tanks and piping, or for their excellent electrical conductivity as in bus bar applications. These alloys have relatively poor mechanical properties and would seldom be considered for general structural applications. These base alloys are often welded with matching filler material or with 4xxx filler alloys dependent on application and performance requirements.
2xxx Series Alloys – (heat treatable– with ultimate tensile strength of 27 to 62 ksi) these are aluminum / copper alloys (copper additions ranging from 0.7 to 6.8%), and are high strength, high performance alloys that are often used for aerospace and aircraft applications. They have excellent strength over a wide range of temperature. Some of these alloys are considered non-weldable by the arc welding processes because of their susceptibility to hot cracking and stress corrosion cracking; however, others are arc welded very successfully with the correct welding procedures. These base materials are often welded with high strength 2xxx series filler alloys designed to match their performance, but can sometimes be welded with the 4xxx series fillers containing silicon or silicon and copper, dependent on the application and service requirements.
3xxx Series Alloys – (non-heat treatable – with ultimate tensile strength of 16 to 41 ksi) These are the aluminum / manganese alloys (manganese additions ranging from 0.05 to 1.8%) and are of moderate strength, have good corrosion resistance, good formability and are suited for use at elevated temperatures. One of their first uses was pots and pans, and they are the major component today for heat exchangers in vehicles and power plants. Their moderate strength, however, often precludes their consideration for structural applications. These base alloys are welded with 1xxx, 4xxx and 5xxx series filler alloys, dependent on their specific chemistry and particular application and service requirements.
4xxx Series Alloys – (heat treatable and non-heat treatable – with ultimate tensile strength of 25 to 55 ksi) These are the aluminum / silicon alloys (silicon additions ranging from 0.6 to 21.5%) and are the only series that contain both heat treatable and non-heat treatable alloys. Silicon, when added to aluminum, reduces its melting point and improves its fluidity when molten. These characteristics are desirable for filler materials used for both fusion welding and brazing. Consequently, this series of alloys is predominantly found as filler material. Silicon, independently in aluminum, is non-heat treatable; however, a number of these silicon alloys have been designed to have additions of magnesium or copper, which provides them with the ability to respond favorably to solution heat treatment. Typically, these heat treatable filler alloys are used only when a welded component is to be subjected to post weld thermal treatments.
5xxx Series Alloys – (non-heat treatable – with ultimate tensile strength of 18 to 51 ksi) These are the aluminum / magnesium alloys (magnesium additions ranging from 0.2 to 6.2%) and have the highest strength of the non-heat treatable alloys. In addition, this alloy series is readily weldable, and for these reasons they are used for a wide variety of applications such as shipbuilding, transportation, pressure vessels, bridges and buildings. The magnesium base alloys are often welded with filler alloys, which are selected after consideration of the magnesium content of the base material, and the application and service conditions of the welded component. Alloys in this series with more than 3.0% magnesium are not recommended for elevated temperature service above 150 deg F because of their potential for sensitization and subsequent susceptibility to stress corrosion cracking. Base alloys with less than approximately 2.5% magnesium are often welded successfully with the 5xxx or 4xxx series filler alloys. The base alloy 5052 is generally recognized as the maximum magnesium content base alloy that can be welded with a 4xxx series filler alloy. Because of problems associated with eutectic melting and associated poor as-welded mechanical properties, it is not recommended to weld material in this alloy series, which contain higher amounts of magnesium with the 4xxx series fillers. The higher magnesium base materials are only welded with 5xxx filler alloys, which generally match the base alloy composition.
6XXX Series Alloys – (heat treatable – with ultimate tensile strength of 18 to 58 ksi) These are the aluminum / magnesium - silicon alloys (magnesium and silicon additions of around 1.0%) and are found widely throughout the welding fabrication industry, used predominantly in the form of extrusions, and incorporated in many structural components. The addition of magnesium and silicon to aluminum produces a compound of magnesium-silicide, which provides this material its ability to become solution heat treated for improved strength. These alloys are naturally solidification crack sensitive, and for this reason, they should not be arc welded autogenously (without filler material). The addition of adequate amounts of filler material during the arc welding process is essential in order to provide dilution of the base material, thereby preventing the hot cracking problem. They are welded with both 4xxx and 5xxx filler materials, dependent on the application and service requirements.
7XXX Series Alloys – (heat treatable – with ultimate tensile strength of 32 to 88 ksi) These are the aluminum / zinc alloys (zinc additions ranging from 0.8 to 12.0%) and comprise some of the highest strength aluminum alloys. These alloys are often used in high performance applications such as aircraft, aerospace, and competitive sporting equipment. Like the 2xxx series of alloys, this series incorporates alloys which are considered unsuitable candidates for arc welding, and others, which are often arc welded successfully. The commonly welded alloys in this series, such as 7005, are predominantly welded with the 5xxx series filler alloys.
Summary - Today’s aluminum alloys, together with their various tempers, comprise a wide and versatile range of manufacturing materials. For optimum product design and successful welding procedure development, it is important to understand the differences between the many alloys available and their various performance and weldability characteristics. When developing arc welding procedures for these different alloys, consideration must be given to the specific alloy being welded. It is often said that arc welding of aluminum is not difficult, “it’s just different”. I believe that an important part of understanding these differences is to become familiar with the various alloys, their characteristics, and their identification system.
Additional Information Sources
There are a number of excellent reference sources available exclusively addressing aluminum welding; One being the Aluminum Association’s “Welding Aluminum Theory and Practice” and another, is the American Welding Society Document D1.2 – Structural Welding Code – Aluminum. Other documents available from the Aluminum Association that assist with the design of aluminum structures are the Aluminum Design Manual and Aluminum Standards and Data. These documents along with the alloy designation documents mentioned earlier in the article can be obtained directly from the AWS, or The Aluminum Association as appropriate.
AWS Tel: 1 800 443 9353 Web Site:
SeaTools for DOS tutorial
Posted: Sunday, May 28, 2017 by Tyler Durden inSeaTools for DOS tutorial
SeaTools for DOS is a comprehensive, easy-to-use diagnostic tool that helps you quickly determine what is preventing you from accessing data on your desktop or notebook computer. It includes several tests that will examine the physical media on your Seagate or Maxtor disk drive and any non-Seagate disk drive. This is the walk-through for both the old (text) and new (GUI) version.
In order to use SeaTools for DOS choose to download the floppy diskette version or the bootable CD image version.
Creating a diskette
For the floppy diskette version you will need one 1.44MB floppy diskette. Click the .EXE file downloaded from the Seagate web site and follow the on-screen instructions.
Creating a CD using the bootable CD image .ISO file.
View Document ID: 201431 for details on burning the .ISO file to a CD.
 Just copying the files to a CD will not work; the file must be burned as an image to the CD.
Once the bootable media has been created then boot the computer with the media in the drive. If it doesn't boot from the media the boot order may need to be adjusted in the computer BIOS. See Document ID: 184971 or the user guide for your computer for information on changing boot sequence.
 This utility will not detect external drives. Please use SeaTools for Windows to test external drives.
There are three different ways to use SeaTools for DOS:
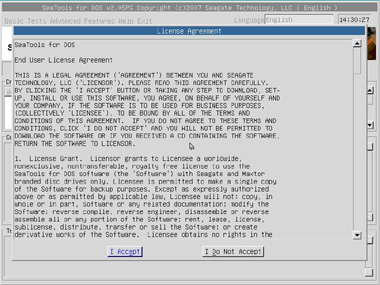
Simply click I Accept to continue.
This will take you to the main menu page.
This will take you to the main menu page.
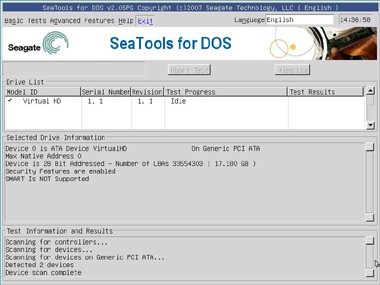
Under the Basic menu:
- Short test - Runs a DST test against Seagate drives. If DST is not supported by the drive, Seatools runs a read test. This test takes about 2 minutes.
- Long test - Runs a full scan of the drive. This is usually used to find and repair bad sectors.
- Acoustic test - Spins the drive down so you can determine if noise in a system is caused by the drive or by something else.

Advanced Features
- Set Capacity to 32GB - Limits drive to 32GB for use on Pentium 3 or older systems.
- Set Capacity manually - Limits drive to a specific number of Logical Block Addresses (LBAs), useful when replacing an unusual drive size in a RAID.
- Set Capacity to MAX - Used to resize drive to full capacity (does not bypass the Limit Capacity Jumper).
- Erase Track Zero - Quick Zero fill to erase the data and partitions from a drive. This option requires one second to complete.
- Timed Erase (10 second, 20 seconds, 1 minute, 5 minutes) - Handy for when quick zerofill just doesn't get it all (ie, in case of boot loaders, etc).
- Full Erase - Fills the entire drive with zeros. It can be used to recover bad sectors and erases all data.
 This is not a Secure erase .
Below is the Results and Progress screen:
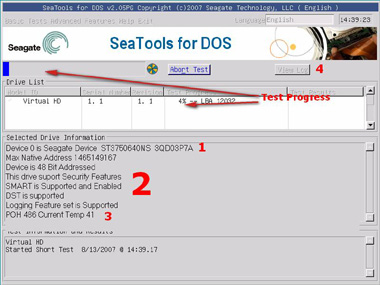
- Model number and Serial number for drive selected.
- Drive status and supported features displayed.
- POH - Power on hours displayed; and Drive temperature in Celsius.
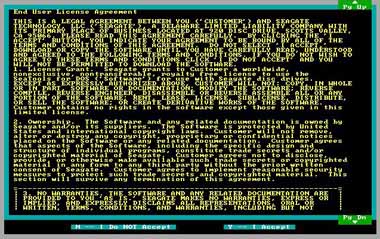
Read the agreement and press Y to accept the terms and continue to the testing or press N to exit the program. Use the Page Up and Page Down keys to scroll.
Once you agree to the license terms the testing screen will appear.
Once you agree to the license terms the testing screen will appear.
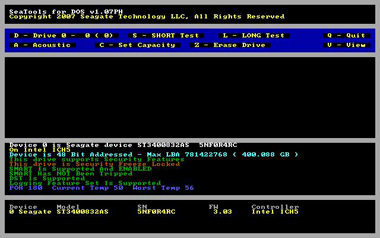
See here the varying elements of the old version's testing screen.
- D or 0-9 - Switches drives - Select which drive to perform actions on (see device area for correlating number).
- S - Short test - Runs a Drive Self-Test (DST) test against Seagate drives. (If DST is not supported, Seatools runs a read test). Takes about 2 minutes.
- L - Long test - Full scan of the drive. Usually used to find and repair bad sectors.
- Z - Zero Fill - Wipes out the data on the drive. Good for erasing corrupted or unusual partitions. It will erase ALL partitions and data on the drive. Quick and Long options supported.
- A - Spin down drive (for Acoustic test) - Spins the drive down so you can determine if noise in a system is caused by the drive or by something else.
- C - Set Capacity - Used to set drive capacity to surpass the common 32GB and 137GB limits. Also used for drives that get clipped to a lower capacity.
- V - View log file - Pulls up the log file for review.

The explanation for the multi-colored text near the bottom follows:
White text: The device (ie, Device 0) and its model and serial numbers.
Yellow text: The motherboard chipset.
Aqua text: Whether the motherboard supports 48-bit logical block addressing, and the maximum LBA for this drive along with its capacity.
Green text: S.M.A.R.T. status. If SMART has been tripped, then there is no need to run a test. The drive should be replaced.
Green text: DST (Drive Self Test) support status - If DST is supported it will be used during testing.
Blue text: Operating temperature status - Current and Max registered temp - useful in determining if heat is a factor in drive trouble or drive failure. See Product manual for specified Operating temperature. The Worst Temp refers to the highest temp that the drive has ever experienced in its lifetime.
 A common unusual reading displays 253 Celsius, which simply means that the drive does not support the temperature reading feature. It is nothing to worry about.
POH = Power on Hours - Tells how long the drive has been running in its total lifetime.
White text: The device (ie, Device 0) and its model and serial numbers.
Yellow text: The motherboard chipset.
Aqua text: Whether the motherboard supports 48-bit logical block addressing, and the maximum LBA for this drive along with its capacity.
Green text: S.M.A.R.T. status. If SMART has been tripped, then there is no need to run a test. The drive should be replaced.
Green text: DST (Drive Self Test) support status - If DST is supported it will be used during testing.
Blue text: Operating temperature status - Current and Max registered temp - useful in determining if heat is a factor in drive trouble or drive failure. See Product manual for specified Operating temperature. The Worst Temp refers to the highest temp that the drive has ever experienced in its lifetime.
 A common unusual reading displays 253 Celsius, which simply means that the drive does not support the temperature reading feature. It is nothing to worry about.
POH = Power on Hours - Tells how long the drive has been running in its total lifetime.
Acoustic Test
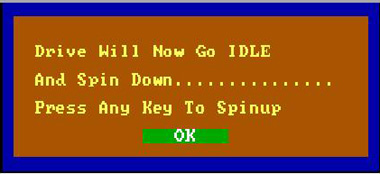
Once activated, the drive will spin down so you can tell if noise is coming from the drive or other components (like a computer fan). The drive will remain spun down until user presses a key.
The Pop-up window will remain open for several seconds until the drive spins back up.
The Pop-up window will remain open for several seconds until the drive spins back up.
Set Capacity
- S - Set 32 GB Capacity: Useful for ATA drives on older motherboards that will lock up if the drive is larger than 32 GB. This solution sets the drive to 32 GB. If too much capacity is lost, you can consider an add-in ATA controller that can fully support >32 GB.
- R - Reset to Drive Maximum: Useful for both ATA and SATA drives that have been clipped (either manually or spontaneously) back to its maximum capacity.
- M - Set Manually: Often useful for ATA and SATA drives as an alternative to attempt if the Reset to Maximum fails. Sometimes used to make all drives in a RAID array have the exact same size (use a specific number of sectors on the drive to set the size).
- Q - Back to Main Menu.
Zero Fill
Main menu options: Z-Erase Drive is the zero-fill option.
Main menu options: Z-Erase Drive is the zero-fill option.

Here is the Zero-fill submenu.

On the Zero Fill sub menu you have the following options:
- Z - Quick Zero Fill (first 63 sectors of the drive, instantaneous)
- A - Full Zero Fill (every sector of the drive, may take many hours)
- F - Timed Zero Fill where T adjusts the time.
Drive Information
This is the yellow text seen on the bottom of the main menu screen.
This is the yellow text seen on the bottom of the main menu screen.

Shows hard drives detected
- Device number - Used to select which drive to test.
- Model number
- SN - Serial Number
- FW - Firmware Revision - Useful on SCSI and SATA products and a few ATA products.
- Controller - Chipset to which the drive is connected. Useful for some SATA and capacity issues. If it is an old chipset, the 28-bit LBA limit may apply, and so the chipset may only support SATA speeds of 1.5Gb/s.
If a drive does not show up in this area then power off the computer and confirm the drive is installed correctly.
View the installation assistance page for details on configuring various types of drives.
View the installation assistance page for details on configuring various types of drives.
Log File
Log file is stored on boot media if writeable or in memory for the CD version. It is stored as: Serial#.LOG
Ex: 5NF0R4RC.LOG
To view log in software, press V.
To exit log viewer, press the Escape key.
Log file is stored on boot media if writeable or in memory for the CD version. It is stored as: Serial#.LOG
Ex: 5NF0R4RC.LOG
To view log in software, press V.
To exit log viewer, press the Escape key.
Test Status (during a DST)
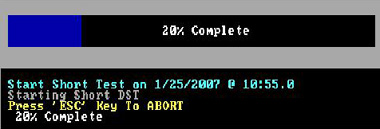
During a test the top part of the display shows a progress bar and the middle area shows the results.
After the test is complete, the middle area continues to show the result, and the top goes back to showing command options.
After the test is complete, the middle area continues to show the result, and the top goes back to showing command options.
Bad Sector Repair (Long Test)
If bad blocks are found during a long test, a prompt will ask how to proceed.
The screen below appears at the end of the scan or if the user aborts the test if bad sectors have been discovered on the drive.
The screen below appears at the end of the scan or if the user aborts the test if bad sectors have been discovered on the drive.
Example:
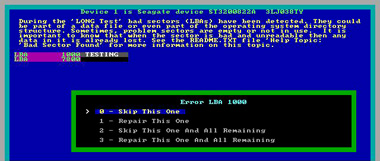
Follow the instructions on the screen to proceed.
For further information about SeaTools for DOS view the SeaTools for DOS User Guide.txt file.
For further information about SeaTools for DOS view the SeaTools for DOS User Guide.txt file.
- Download the SeaTools for DOS .ISO image, and save it to your desktop.
- Burn this image to a blank CD or DVD.
View Document ID: 201431 for details on burning the .ISO file to a CD. - Once you have burned the image to a CD or DVD, place the disc into the CD/DVD-ROM tray and shut down your computer. Once your computer is shut down, wait 3 seconds and press the power button.
- After you press the power, immediately press and hold the C key on your keyboard. This will tell your Mac to boot from the CD or DVD that you created.
- Once booted into the SeaTools for DOS CD/DVD, you will see a list of drives. Select the drive you would like to test.
- Choose the test you want to run on your drive - you may choose between Long and Short tests and the Generic tests.
- Please record any test results or errors that you see.
Single tray icon? • Hard Disk Monitoring
Posted: by Tyler Durden inBoot SeaTools off of a USB Drive | nowhereLAN
Posted: by Tyler Durden inAmtec Corrosion And Coatings Consultants
Posted: Saturday, May 27, 2017 by Tyler Durden inToner Cartridge Printing Defects: Causes and Solutions
Posted: Thursday, May 25, 2017 by Tyler Durden inTop 6 Myths about Compatible Cartridges - Inkjet Wholesale Blog
Posted: by Tyler Durden in
Top 6 Myths about Compatible Cartridges - Inkjet Wholesale Blog
It’s very much like the movies. There’s a secret war going on in the world that the common man is completely unaware of. The battles in this secret war are occurring behind closed doors and under marketing strategies. This is a war that has a bearing on your wellbeing as well because it impacts your financial capacity. This is a battle between Original Equipment Manufacturers (OEMs) and the aftermarket manufacturers of compatible cartridges.
Setting the dramatics aside, there’s actually a tussle happening between the aftermarket and the OEMs. It’s common for OEMs to go after aftermarket manufacturers through legal means. This makes the aftermarket manufacturers of compatible cartridges the underdogs and the men in the right.
What’s Behind the Competition between Aftermarket Manufacturers and OEMs?
 The business strategy of OEMs is designed on the same lines as razor blades. The idea is to sell the initial item at extremely cheap prices. Sometimes, the products can be so cheap that the manufacturers are actually selling them at a loss. However, by selling the initial device at such throwaway prices, the manufacturers actually ensure long term customers.
They make huge sums of money from these customers (easily recouping their losses and soaring high into insane profit levels) on the back of consumables. In the case of razor manufacturers, these consumables are the blades while in the case of printer manufacturers, these consumables are cartridges
Initially, when printer OEMs came up with the idea to follow the razor business model, they made a lot of profit. However, soon after, third party manufacturers started showing up. These manufacturers would produce compatible cartridges that could be used in lieu of the genuine cartridges.
Even though the initial versions of compatible cartridges couldn’t match up to the print quality of genuine cartridges, they thrived because of the extremely low prices. Now, the print quality provided by compatible printer cartridges is comparable to genuine cartridges and the aftermarket manufacturers are swiftly eating into the OEM market share.
While the main weapon being used by aftermarket manufacturers of compatible cartridges is constant improvement in quality and low prices, every OEM’s weapon of choice is marketing. This is why there are so many myths surrounding compatible cartridges in the market today. Here, we’ll look to debunk many of these myths.
Myth #1: Compatibility Cartridges Provide Poor Print Quality
 This myth about compatible cartridges began when the aftermarket industry was in its infancy. Initially, the best technologies and budgets weren’t available to aftermarket manufacturers. The result was slightly lower quality compatible printer cartridges.
However, there’s been a quantum leap in the capabilities of aftermarket manufacturers. In fact, such has been the technological advancements that a few OEMs have started to tie up with aftermarket manufacturers as opposed to attacking them.
Moreover, there is a significant exchange of expertise between the two ‘warring’ factions. In any case, the modern day compatible cartridges can provide the same print quality that genuine cartridges do.
You only have to look through our Customer Reviews section to see what other people like you are saying about the print quality provided by compatible printer cartridges.
Myth #2: Compatible Cartridges Can End Up Damaging Printers
This myth has been propagated by the OEMs purely to discourage consumers from switching away from genuine cartridges to compatible cartridges. In fact, this myth showed up right after a sudden increase in the speed with which compatible printer cartridges were eating into OEM market share.
This is a relatively recent myth in the world of compatible cartridges. It is usually propagated along with the information that the printer machine, genuine cartridges, and recommended paper are ‘carefully’ designed to operate together. The implication is that unless they are used together, the print quality won’t be good and the printer may get damaged.
However, the reality is that compatible cartridges are no different from genuine cartridges in this regard. Leakage from a printer cartridge damaging a printer is extremely rare and unlikely. While technically possible, the chances of this happening are very low.
Moreover, this can happen regardless of whether you’re using genuine or compatible cartridges. There’s literally no proof backing the claim that compatible printer cartridges are more prone to causing such situations.
Myth #3: All Compatible Cartridges Are Of the Same Quality
 While it’s true that printer cartridges have been categorised into genuine, compatible, and remanufactured, this doesn’t mean that there are no other differences worth considering. For instance, within the genuine cartridge category, do you think the performance of one brand cartridge is the same as another brand cartridge?
The answer is that it won’t be. The reason is that they are manufactured under different systems, different objectives, and different people. The same holds true for compatible cartridges.
There are multiple manufacturers out there manufacturing compatible cartridges. One brand of these cartridges will not have the same performance as another brand. While some may be extremely poor, others’ performance may be exceptional.
The trick to making sure that you get the best compatible printer cartridges is to find a manufacturer who is willing to back his work. This backing would usually come in the form of guaranties and warranties.
For instance, all compatible cartridges at Inkjet Wholesale are backed by our 100% Lifetime Shelf Guarantee and Printer Perfect Warranty. This should show you how confident we are of their quality.
Myth #4: Compatible Cartridges Have Low Page Yield
Another form of this myth is that compatible cartridges don’t contain enough ink because page yield is nothing but the amount of ink contained in the cartridges. However, this myth is also baseless. In fact, the exact opposite of this myth is true.
Compatible printer cartridges, on an average, contain more ink than genuine cartridges. Genuine cartridges are rarely ever completely filled but compatible printer cartridges are usually filled to capacity. This means that page yield of compatible cartridges is higher than genuine cartridges.
Myth #5: Using Compatible Cartridges Will Void OEM Warranties and Guarantees
 Another way that OEMs have tried to scare off printer users from switching to compatible cartridges is by implying that using compatible cartridges will void OWM warranties and guarantees.
There’s literally no way that this is possible because the law forbids the voiding of warranties and guarantees on account of the use of third party consumables. It isn’t even legal for any manufacturer to force its consumers to use specific types of consumables.
This means that you can use compatible cartridges without worrying about voiding your OEM provided warranties and guarantees.
Myth #6: Compatible Cartridges Are Made In Third World Countries
This myth is like an extension of the myth that compatible cartridges can’t provide good print quality. The premise is that these cartridges can’t provide good print quality because they are manufactured in third world countries where technology and manufacturing processes aren’t very advanced.
This myth is usually believed by those people who think that genuine cartridges are manufactured in developed countries when the exact opposite is true. The state of the world economy is such that most international companies have decided to locate their manufacturing facilities in developing nations such as China, India, Indonesia, and Brazil.
Effectively, it can be said that many genuine cartridges are manufactured in third world countries. Moreover, it isn’t like compatible cartridges aren’t manufactured in developed economies either. For instance, the cartridges we sell are sourced from the United Kingdom.
What all this means is that there is no overarching connection between the type of cartridges and where they are manufactured in the world.
How to Remote View and Control Your Android Phone
Posted: Sunday, May 21, 2017 by Tyler Durden inWhy is the Color Black Represented with a "K" in CMYK? - Gearside Design
Posted: by Tyler Durden in
Why is the Color Black Represented with a "K" in CMYK? - Gearside Design
The K in CMYK stands for “Key”, but don’t let anyone get away with that because it doesn’t answer the question; the answer is much more interesting than that. The “key plate” is said to add the “detail” to a printed image. This is true in that the black plate in a four color process print pushes the contrast and creates “detail”. Many people suggest that the theory of using K instead of B because it may be easily confused with “Blue” is a myth. While it is highly speculative what the reasoning is, there are context clues as to why it may actually be true.
The Myth…?
The story goes that old-style presses had only one color station, and must re-run material through the press for each color. After one color was laid down, the plate would need to be removed, the color station cleaned, the next color loaded, and so forth. This was very time consuming and individual print jobs would take days to finish. After a long day of printing, a press apprentice would begin loading the last color into the press: “B”. If any confusion occurred, the press could be loaded with blue ink, the entire job would need to started over, and the apprentice would most likely be beaten.
It seems natural that printers would want to use an alternative letter for black so this confusion could be avoided. The term “key” may be entirely pulled out of a hat.
The Context Clues
Mark Gatter, in the book he published titled “Getting it right in print”, states the “key plate” is used align the other plates, but does not mention why it is called “key”. While the term today may have adopted the meaning for the process of aligning plates, the term “key” does not originate from this process. The color “registration” is more closely related to the process of aligning plates. The term “key” originates from the rotary printing press in 1843 that had screw keys to control the amount of ink printing on a substrate. Offset presses also use this mechanism.
Most other countries who speak languages other than English typically used “CMYK” to mean four color process; even if the individual colors don’t begin with the same letters. However, in French speaking countries, the acronym is “CMJN” is used meaning “Cyan, Magenta, Jaune, Noir”. “Jaune” and “Noir” translate to “Yellow” and “Black” respectively. This shows that in certain countries, the model directly translates to “black” and not “key” or any other term referring to alignment, detail, or contrast.

While Johannes Gutenburg invented the printing press in Germany around 1454 which revolutionized moveable type, it was Jacob Christoph Le Blon who invented three-color and four-color process printing around 1725. What is interesting is that his original color models were RYB and RYBK. The argument here is that the color blue (represented by “B”) is used in the same process as black, so the initial may have been changed to avoid confusion. His three-color process would have used the same aligning technique as his four-color process, so if “key” was meant to mean “key plate”, it would theoretically have been the blue plate in his three-color model.
While it may never be known the exact origin of the use of “key”, it can be discerned that the myth could perhaps be true and that the origin of the term could have been to simply avoid confusion with the color blue. It appears the context clues may outweigh the notion that K is used to denote “detail” or “contrast”.
48 Free $0 Courses @ Udemy Online Courses (All Links inside Post) - OzBargain
Posted: Saturday, May 20, 2017 by Tyler Durden in
48 Free $0 Courses @ Udemy Online Courses (All Links inside Post) - OzBargain
3 Beliefs that will Transform your Life(udemy.com)
Amazon Kindle Publishing: Learn My Exact Bestseller Strategy(udemy.com)
Creative Thinking Workshop: Exercises to Boost Creativity(udemy.com)
EFT Emotional Freedom Technique: Hair Pulling & Skin Picking(udemy.com)
Fun Dog Training Workshop To Creating Art With Your Dog(udemy.com)
Technology:
After Effects Learn Logo Reveal or Logo Pop-Up Animation(udemy.com)
Angular 2+ with Typescript - Essential Training(udemy.com)
Become Expert in Photo Manipulation Photoshop City on Attack(udemy.com)
Build an Advanced Keylogger using C++ for Ethical Hacking!(udemy.com)
Create Amazing Whiteboard Animation With Sparkol VideoScribe(udemy.com)
DIY Design Professional Web Banners in Photoshop 4 Beginners(udemy.com)
Etsy Ultimate Masterclass: SEO & Social Media Mastery Course(udemy.com)Excellence in Excel! Make any chart dynamic in Excel!(udemy.com)
Flappy Bird Clone - The Complete SFML C++ Game Course(udemy.com)
How to Create a Wikispaces Classroom Website without coding(udemy.com)
Learn Professional Landscape Images Retouching Photoshop(udemy.com)
Learn to Make iPhone Apps with Objective C for iOS7(udemy.com)Mastering Advanced Color Grading in Photoshop(udemy.com)
Modern Web Design HTML5 CSS3 beginners guide to Websites(udemy.com)React JS - Build real world JS apps & deploy on cloud(udemy.com)Scala Programming For Beginner to Advance Step By Step(udemy.com)
Swift 3 - Master Swift Development From Scratch(udemy.com)
Music & Video:
#13 Hand Coordination - Turn 8th Note to 16th Note Rhythm(udemy.com)
Break the Guitar Rut: A Different Way to Play Chords(udemy.com)
Drumming Accelerator: How To Get The Best Start Possible(udemy.com)
Music Theory for Electronic Producers - The Complete Course!(udemy.com)
Recording Vocals at Home like a Professional Sound Engineer(udemy.com)
Ultimate Beginner Guitar Masterclass(udemy.com)
Business:
Accounting Is Easy (for Beginners)(udemy.com)
Affiliate Marketing, Fast Track to becoming an Authority(udemy.com)
Basics Of Twitter Marketing For Beginners With Software(udemy.com)
Digital Marketing Strategies for Business Owners(udemy.com)
eBay Marketing A-Z: eBay Pro Academy(udemy.com)
Facebook Free Business Advertising with Facebook videos(udemy.com)How to Create Effective Buy & Sell Ads(udemy.com)
How to Use Marketing Automation in Online Business(udemy.com)
Intro to Buzzstream: A Digital Marketing, SEO & PR Tool(udemy.com)
Local Business Marketing & Website Traffic Growth Strategies(udemy.com)
Logo Designing for Your Business in an Hour(udemy.com)Marketing For Consultant – Become An Authority & Get Client(udemy.com)
Master Prezi Classic - Beginner through Expert Projects(udemy.com)
QUICK Frontend Website Creation HTML CSS JavaScript jQuery(udemy.com)
The Complete Facebook Ads & Marketing Course 2017(udemy.com)
The Social Media Marketing Mega Bundle - 7 Courses In 1(udemy.com)

